Pages

Monday, February 15, 2016

Shooting Creativity

In unit 1 of my new course A Nation's Argument, we focus on what makes a good argument. We defined argument, which comes from the Latin word meaning to clarify. We learned about the structure of arguments, by looking at the Declaration of Independence that America wrote to the British. We also looked at art, and how that can also be used to make an argument, or just show the reality of a subject, which is an effort at making something clear. For the action project, we had to make our own Declaration of Independence about a class/course we would want to exist in our school. Something I liked about this was that we got to chose our class, something that means a lot to us. I would say a challenge was actually coming up with an idea because in my class, a lot of people’s ideas overlapped. Please enjoy my Declaration of Independence!
                                                                                                     

I declare that there is a independent study class that is all about filmmaking and acting. Films/videos can show everyone something that is so amazing, either fake or real, and still get someone to feel a lot of emotions. Acting, which is usually part of a film, is so important, because not only does it make the audience feel more, but it also makes the person who is acting, more open to trying new things. From acting and filmmaking you can learn so much, about almost anything, and open new ideas to yourself. The purpose of school, is for kids to get a chance to learn and grow as people, both educationally, and socially, and to see and meet new people from all over. With the education given to us, we can learn from old/new things and use them in our lives to become better people. All of this can be achieved with an open mind, and wanting to learn more. My unalienable rights as a student are to grow, and have my desire to learn and interests nurtured, and with that filming and acting can be a shortcut to learning about new cultures, things that are going on in the world, and what could happen to our world. With the fact that filming can open up someone’s imagination. Nothing will ever be too boring because in this class you will be able to explore your imagination, and grow at perfecting this art.


The guiding question to this course called , “Shooting Creativity”, is: What can one film do to one person? Think about that, too, because hasn’t a film made you cry, or laugh to the point of crying? I have felt a lot from movies -- they let me into new things, explore my imagination, and be able to see the realness in a subject that sometimes you just can't get from a book. I feel like many other people feel this way, and I want them to be able to have the skills and tools they need to pursue their dreams of exploring this artistic medium.


This course will be offered during the elective term of the school year, because it is neither a STEAM or Humanities course, but in a way both, since there will be a science to the editing, and history will be added to the units. There will be three units: the first unit, called “Act”, will be focusing on acting; the different types there are; what it is like to be on stage versus being on set; and how to be a strong wonderful actor. We will also look at great actors and what makes them so good, how a comedy actor can differ from a drama one, and what can also connect them. The second unit, called “Shooting”, will focus on how to properly film, what makes a good location to film at, and different angles and what they can convey. The last unit, called “Tweak”, will focus on editing, and all the pieces that go into it, including adding special effects, changing the lighting, and trimming and adding stuff in.


My desired outcomes for this class, are for people to learn how to make a great film, by actually learning the editing, camera work, and acting, among other things, that all go into making a wonderful film. This class will take students and bring them into a wonderful world where they can make their own films, and they can explore the kinds of things they like in films. Though certain students will need a lot of different materials; course materials include cameras for shooting, editing software for everyone, and possibly a partnership with a improv place, such as iO Chicago, which is a few blocks from the school. Improv actors are amazing at doing things on the spot, so if there were actors in need, and they would be partnered with us, hopefully they could help. We could even visit them for an FE and learn how acting to them is different from acting to other actors, learning about what they have to do differently.


P1: Film can offer a person something that is very important.
P2: Films can release many emotions in one person.
P3: This course will focus on acting, filming, and editing.
P4: This course will turn someone into an expert on making a film.
C: “Shooting Creativity” should be a class in the GCE School curriculum.


NVA "Expert Film Maker Graph" (2016)


I declare that there be “Filming Creativity” where students can learn all aspects of filmmaking -- camera work, editing, and acting skills. This all will help develop well-rounded, enthusiastic, curious students learn much more, by building the skills to adapt and be open to new things, and make the best films that a high school student could ever make!

Tuesday, February 9, 2016

Lights, Camera, Action!

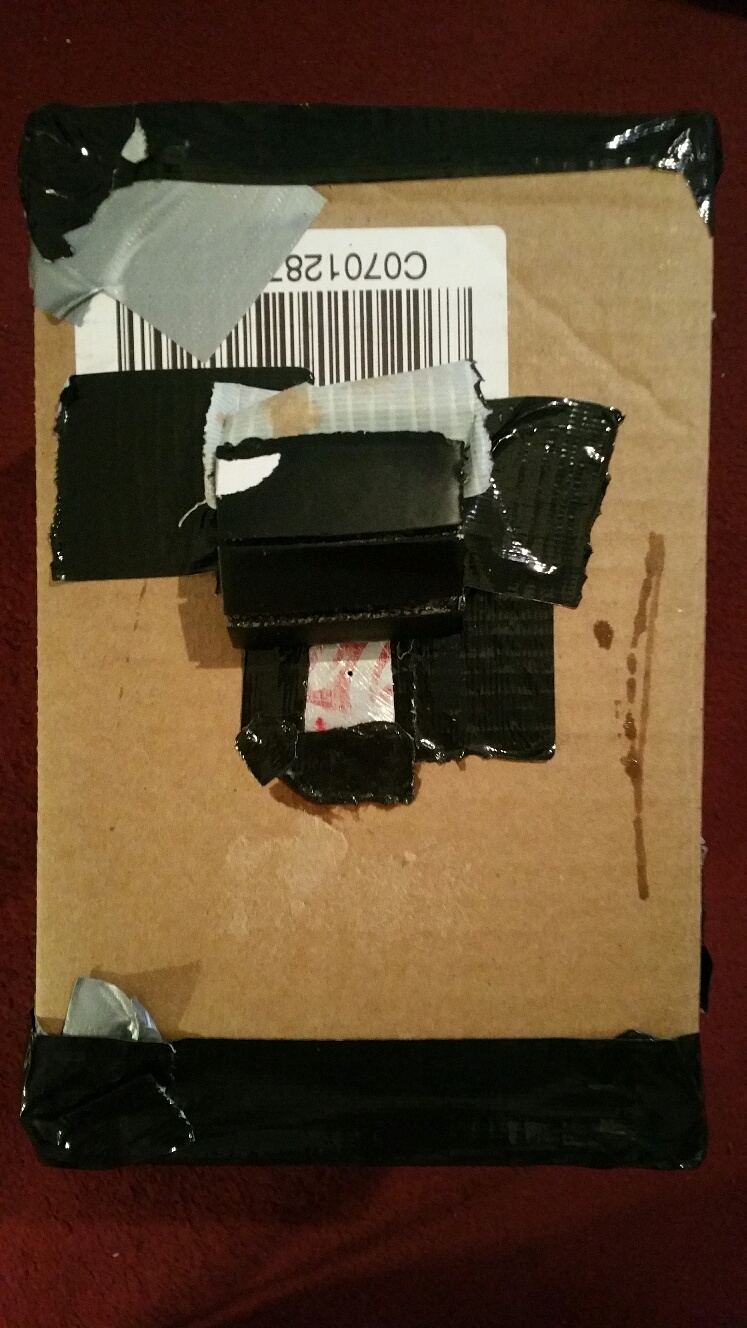
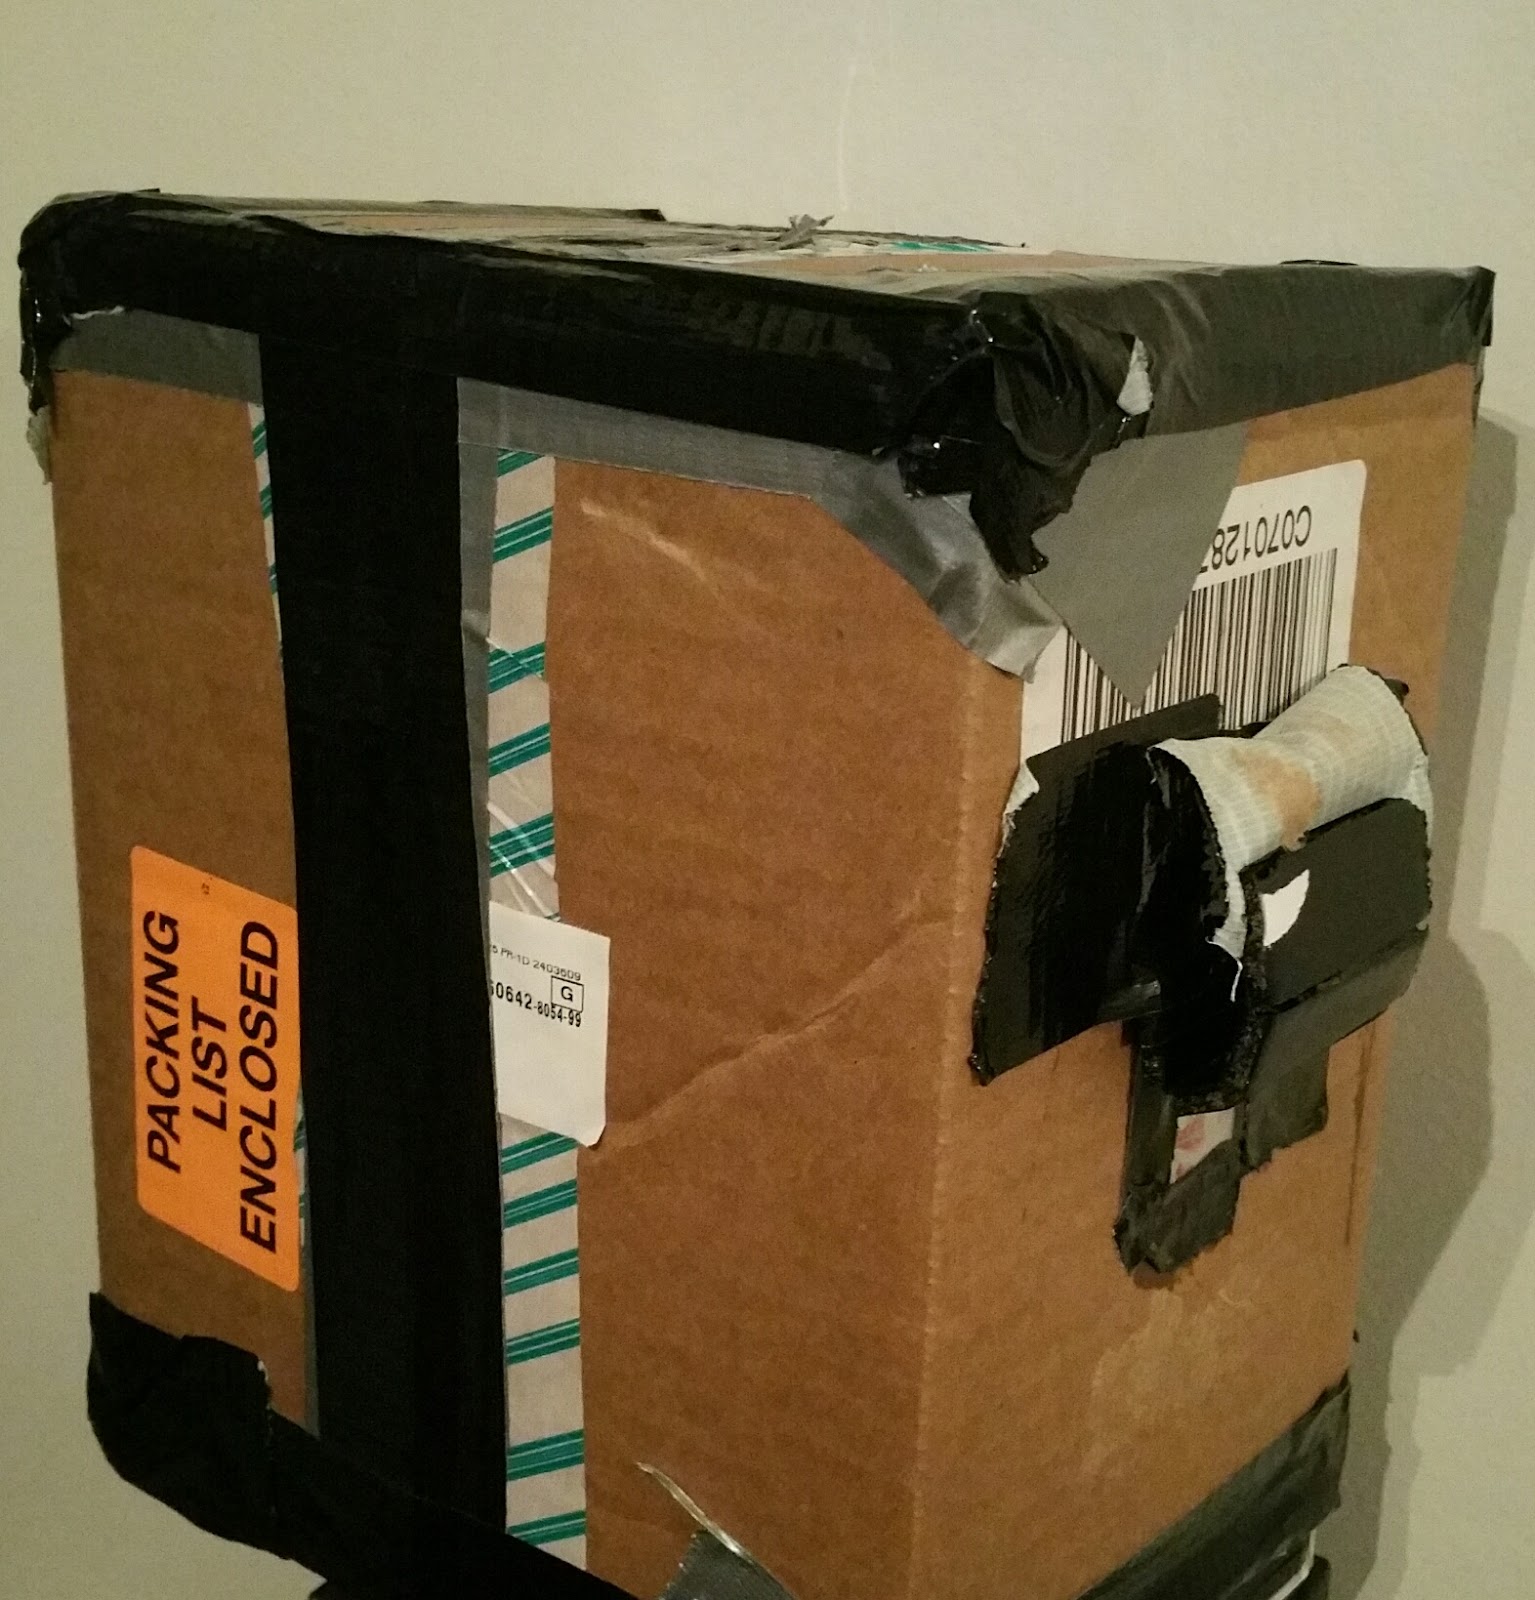
In unit 1 of Light, Sound, and Time, we explored more trigonometry and got in deep with it. We also talked about light, whether it is a particle or wave. Next we looked at colors, and how we are able to see colors, and what they are on the electromagnetic spectrum. We also looked at the human eye, and how it is similar to a camera. Leading me to the action project, we have to make a pinhole camera out of household materials, and create an image with it. With that we have to use the math we have learned and make similar triangles, from the box to what the image will be. The object used in the calculations is different from my actual image, because we needed something that was taller than the height of the pinhole camera. I really liked how we used household items to make a thing that can actually take a picture with film; it honestly amazes me that that is possible. Please enjoy seeing my camera, and the picture I was able to take with it.
2016-02-09_20.58.44.jpg
NVA "Pinhole Camera Side View" (2016) GCE Lab School. 
20160209_205514_resized.jpg
NVA "Pinhole Camera Top View" (2016) GCE Lab School. 
This device will capture light by having a small hole in the top, that will take light and put it inside the camera. When the light enters the camera, whatever image is showing will be flipped on the other side of the box; as shown below.
NVA "Light in Pinhole Camera Example" (2016) GCE Lab School. 
This camera doesn’t illustrate refraction, because refraction only happens when light goes from one medium to another, like air to water or glass, which will physically slow down the speed at which the light is going. Since there is only a hole, it won't slow down the speed of the light.  It is black on the inside because we don’t want the light going into the camera to reflect, because if it did it would ruin the image. When white, it will reflect it, so we make it black to stop the light from doing so. The camera shows light being a wave, because it does not collide with any other light waves. It shows or represents the electromagnetic spectrum, because black is absorbing all the colors that are going into the camera, and the only colors showing are from the image being shown into the camera. The light acts as a particle when it is interacting with the paper, because the particles give off energy and when that happens a chemical reaction happens within the paper, creating an image after going through the developing process.
2016-02-09_21.53.14_resized.jpg
NVA "Pinhole Camera Similar Triangles" (2016) GCE Lab School. 
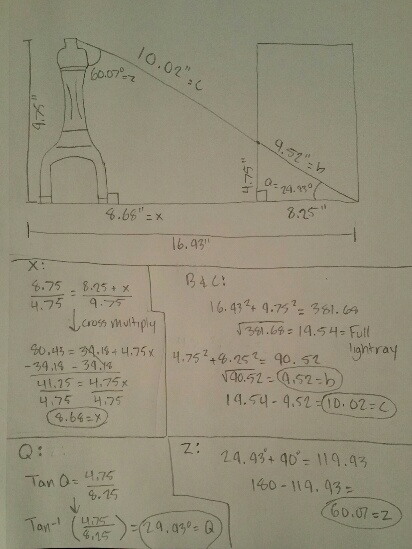
Above are the calculations I did for figuring out the similar triangles that go into taking the picture and the light ray going into the box. The hypotenuse of the triangle is the light ray from the top of the object going down to the bottom right corner of the camera. This is good for having to figure out the distance you need from your camera to your object, so that you can get all of the object in through the pinhole.
NVA "Yoshi Pinhole Picture" (2016) Latin School. 
For the picture, the shutter speed was about 3 minutes, so the film had enough time to absorb all of the light, leading to a better picture. If I were to do this again, I would play around with the times of the shutter speed, so I could get the perfect image. Also I would like to be able to re-position the camera, so that it could get everything in the picture a lot better. I had more objects, a yoyo and a Rubic cube, under the Yoshi that I wanted in the picture. I would probably want to put something underneath to raise the Yoshi and the things it was on.

Friday, February 5, 2016

Go "Get It"

I go into a lot EDM, especially trap music. So I looked for interesting apps, or websites that I could use to make music. I found Music Maker Jam, which I go on my phone first, then my laptop, and my the laptop version had to me able to do much more with it. Here is my Get It  song, under my DJ name, Valy.


NVA "Weeds Door Mural" (2015)


Monday, January 18, 2016

Adding To Instructables

In unit 3 of my Rapid Prototyping course, we learned about life hacks, and how they can make someone’s life a lot easier. For FEs we went to the Sullivan Center building in downtown Chicago, where we made lamps from paper and LED lights. We also went to The Wasteshed, where we were able to buy materials for our projects. What was good is we also looked at safety rules when in a workshop, where there are many tools. This was to prepare us for our action project so we don’t get hurt. Leading me to the action project, we had to create anything we wanted using scraps we found and have it be something useful to the new GCE Building. My partner and I wanted to make a laser cutter, but due to time we couldn’t. Instead we decided to make a bike, guitar, and skateboard rack out of pallets that people threw away. This was really fun and very stressful to work on, mainly due to time. Please enjoy our creation and check out the Instructables page and maybe you can make your own guitar and bike racks!


NVA "Bike Rack" (2016) GCE Lab School
Our project was creating a bike rack for students/teachers to use and the guitar rack will be for our after school club, Music Makers. The Skateboard rack will also be used for students/teachers.

When we went to The Wasteshed and talked to Eleanor, she said “Our store gets things that society throws out, that actually are still useful.” Basically she said that we throw out so many things that we can still use but refuse to, and don’t think/realize what they could also be used for. It is kind of like one man’s trash is another man’s treasure. This relates to my project a lot, because we grabbed pallets that a company had lying out in the snow to throw away. We decided to take them and repurpose them. Even though we bought stuff at The Wasteshed, it still counts, because it was originally thrown away and reused.

For a reference/inspiration we used Wooden Pallet - Bike and Scooter Rack by Davinci2K1, this basically has the same concept, but my partner and I just made some personal adjustments.

My timelapse video was originally 6 minutes and 44 seconds but I used an app on my phone called Video Lapse, which will take your video and convert it to a timelapse. My video went from 6 minutes and 44 seconds to 1 minute and 47 seconds. To get the frame rate I would have to divide 404 seconds, which is 6 min and 44 sec in seconds and 107 seconds, which is 1 min and 47 sec in seconds, and that is 3.77, which is the frame rate. One thing thing that was disappointing about it was that it sped up the audio with it, so I went to Wevideo and silenced it and put a track that I personally made over it.

To take apart the pallet boards to get the planks of wood, my partner and I used a crowbar to take the pieces off, then we used a hammer to hammer out the nails, and the backside of a hammer to pull out the nails. All of this involves a lot of leverage, and having to use leverage to make pulling out all the objects a lot easier. We also used screwdrivers to put in screws after pulling out the nails. This process uses this concept called torque, which is leverage, but leverage that is applied to a circular motion. Something that could make it easier is having a longer handle, that will take away the heaviness of the object. Like holding a hammer from the bottom of the handle, rather than holding in the center.

In this project we used X-Acto knives and hammers, and a lot of power tools. All of them can cause safety problems, so it is very important to be careful when using any type of tool. When cutting, make sure to go slow and easy, this way it will protect you more. When using a hammer or any type of power tool, wear goggles to protect your eyes from something flying in there. For working in general, make sure you are very careful and aware, and if you are tired, maybe take a nap and then work. Making sure your health is in the highest state it can be in is most important for anything when working.

I had fun doing this project, and luckily because I followed all of these safety tips, I was able to finish coming out unharmed. I did learn a lot from this project, and here are five suggestions/tips to focus on when working on this for yourself:

1. Be awake, as this is a lot of work and there is a lot of cutting and hammering, so being awake and aware is very important.

2. Wear gloves if the pallets you use are raggedy, so you don’t get splinters.

3. If you use the the side of the crowbar that has a little curve to it, and hold on to the longer end, you have much more leverage.

4. Always wear goggles when using a power tool that is cutting something.

5. Sand down any wood to make sure that, when the racks are in use, no one gets a splinter.

Finally Overcoming The Wave

In unit 3 of my If These Could Talk course, we focused on the making of the mural that we planned during unit 2. In addition to the creation of the mural, we were also tasked with writing an artist statement and creating a short video to reflect on the experience. I enjoyed creating the mural and getting to see how beautiful it became. GCE is moving into a new building and this mural will be put in there, and something I didn’t like was with the new space, it required us to make a lot changes to our idea. Please enjoy watching the process of making this wonderful mural for my school!


NVA, BKJ, LL, MF, AG

Overcoming The Wave
29.33’ x 37.33’
Acrylic paint, spray paint, wheatpaste

This mural shows a big wave and the boat going against it, and the wave are regular schools in our society. The boat symbolizes our school and how we try to break the “norm” of the teaching style of today. In the mural we used acrylic and spray paint, and made our image on paper, that we wheat pasted onto the wall. In the mural we use all blue with different shades mainly to keep that ocean feel and make the boat pop with that gold color to it. Since this is in the front of the building where people will always see it, it keeps the message of GCE and how we are trying to break the “norm” of our school system today.

Working on this was difficult, we had a hard trouble with having time to go in and paint, because the new GCE building, that we are moving int0, was still in construction when having/needing to paint now and then. My role mainly in working with this mural was drawing out the image with BKJ, and making any revisions we needed to make to it. Then we found out that the construction being done in the new building was not to where we wanted, that our wall that we needed to paint on had to much stuff in front of it and we wouldn’t have time to move it. So we changed our plan, and instead of painting it straight on the wall we had to paint it on paper and then wheatpaste that. So my new role for a while, was holding up paper so my group could trace the image on the paper. Next to those roles, we also set roles for everyone before hand for each day. There was a documentor, an artist director, a mule, and a director of ops. Each role was different for each day. Then for painting was the man who had to replicate some of the foam part that our group member LL did, that missed a day and I had to do my best to replicate it. My favorite role was having to trace it and painting the foam, because I felt my group really trusted my artistic skills. My least favorite was being the mule, which is part of having to hold the paper while people traced, while also being a part of me having to do whatever someone told me to do. If I could change anything about this experience it would be to have more time, one to paint, and two to clear the junk that is blocking our wall.

Video Script:

If These Walls Could Talk is a course about murals. We defined the term, mural and examined how murals can change the spaces that the occupy. For the last project in the course, we created a mural to install in our new school building. I thought this was really fun. It started out very smoothly, because we came up with the idea of what the mural would be so quickly. Then we chose our materials so quickly and we all loved the idea. Then we came to the problem of finding out we would need to separate the image because the part that we could paint on was separated into four panels. Then we had to redesign it, to scale the image properly to go up on the wall. Next, because the space wasn’t cleaned in time, we found out we couldn’t paint straight on the wall and we would have to paint on paper and then wheatpaste that up onto the wall. This really frustrated our group, because the image wouldn’t work with the space as much as it could really have. We wanted the painting to go off the panels a little to create popping out effect, but we couldn’t do that anymore. I think our mural and the idea of it was great but the space not being available was a huge let down. Then another problem was that, when we had to change the process of how the mural would be put up, our group started to fight, because all our perspectives had changed when the way of putting up the mural changed.

If I could change anything, I think I would try to have people working in sync better, everyone was everywhere, because as I said before the way the mural would be put up onto the wall changed. Changing everyone's thought about it. For example one fight we had was how we should paint, one group member started painting first and was making all straight lines, and would fix someone’s lines if they weren’t straight. This was frustrating to BKJ and I, because water isn’t straight, but it was to late to change that due to time restrictions. Besides that I still had fun, I did really like the concept of our painting and the message it has. I think my group was wonderful. We all worked together very nicely, I couldn’t think of anyone I would want to take out of our group, and yes we did have some hiccups, but that comes with having to work in a group. I still think the image looks amazing, even though it’s not going to be straight on the wall. Thank you!

Wednesday, January 13, 2016

Life In Italian

In my second Italian class, we learned how to say directions, stuff we do everyday, and how to describe a person by there looks. For this project we had to create a video doing something, either making food that we made in class, describing your day or just describing a painting. I chose to do describing my day, because it was the most simple, but I liked that I could drawings of my day. Please enjoy learning about an average day for me, in Italian.


Thursday, December 17, 2015

King Me!

In unit 2 of Rapid Prototyping, we learned all about 3D printers and what different kinds there are. We also looked at Riemann Sums and impossible objects, and how those can relate to 3D printers. For an FE we went VisMed3D, which makes body parts out of 3D printers for people. For our action project we had to create three 3D models of a chess piece with a partner. My partner and I chose the king piece, and with that we had to create it out of clay, using 123D Make program, and with a 3D printer. The reason that it looks different was that we had to follow the pattern that each piece is made from the top part that everyone identifies with each piece; like a pawn will be all circles, so our piece is all crosses. What I liked about this project was getting to see a 3D printer print something my partner and I personally made. Something I didn't like about this project, was really having to make all these models in a week, because we had some tech issues. Please enjoy the King Piece we made!!